安装所需的依赖环境
在编译前,我们需要安装编译所需的工具,使用下面命令
sudo apt update # 更新
sudo apt install wget tar make gcc build-essential libpcre3-dev zlib1g-dev libssl-dev
下载源码
通过编译安装Nginx的好处是可以添加一些模块,定制内容。
-
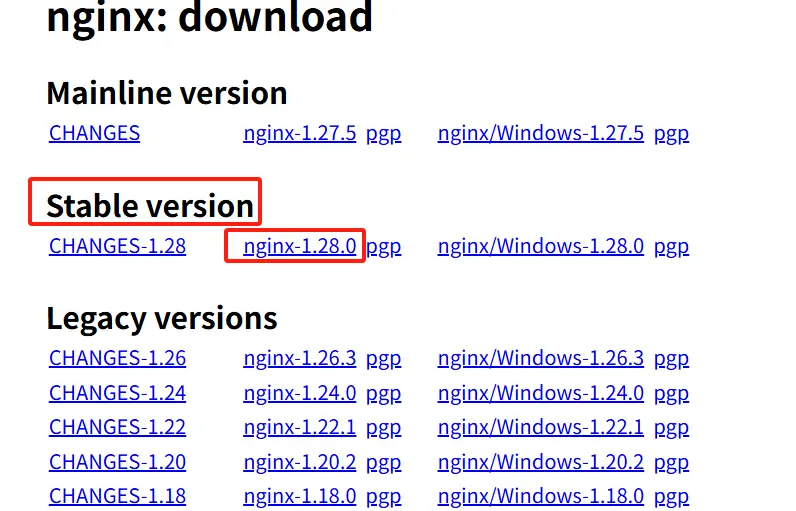
在Nginx官网下载安装包,建议下载稳定版本(Stable version),下载完成后,通过FTP将安装包上传到服务器
![nginx-downlaod-page]()
-
通过wget命令安装,以
nginx-1.28.0为例
wget -c https://nginx.org/download/nginx-1.28.0.tar.gz
解压
通过tar工具将其解压,然后进入解压后的源码文件夹
tar -xzvf nginx-1.28.0.tar.gz # 解压
cd nginx-1.28.0 # 进入Nginx源码目录
编译
- 创建www-data用户,如果用户存在的话会提示
useradd: user 'www-data' already exists
sudo useradd -s /sbin/nologin www-data -M
- 预编译配置
--prefix=/usr/local/nginx/ -> 指定 Nginx 的安装目录,通常是 /usr/local/nginx--user=www-data --group=www-data-> 设置 Nginx 工作进程(Worker Processes)的运行用户和用户组,www-data 是Ubuntu/Debian默认的 Web 服务用户(Apache/Nginx 都使用它)。- 注意:避免直接以 root 身份运行 Web 服务,因为服务器可能有漏洞,如果不法分子获取到了web访问的权限,通过root用户,就能控制整台电脑。
--with-http_stub_status_module-> 启用 Nginx 的 状态监控模块,通过访问 http://你的服务器/nginx_status 可以查看 Nginx 的实时状态信息
./configure --prefix=/usr/local/nginx/ --user=www-data --group=www-data --with-http-stub-module
- 编译
sudo make -j4
安装
- 如果你前面的编译没有出错的话,最后就可以安装了
sudo -j4 install
- 查看Nginx是否安装成功
ls -l /usr/local/nginx/
启动Nginx
sudo /usr/local/nginx/sbin/nginx
# sudo /usr/local/nginx/sbin/nginx -s stop  # 停止 Nginx 命令
这一步我们还是无法在外网访问nginx,需要开启防火墙,我们使用ufw来开启80端口,没有的话可以通过sudo apt install ufw安装
sudo ufw allow 80 # 开放防火墙80端口
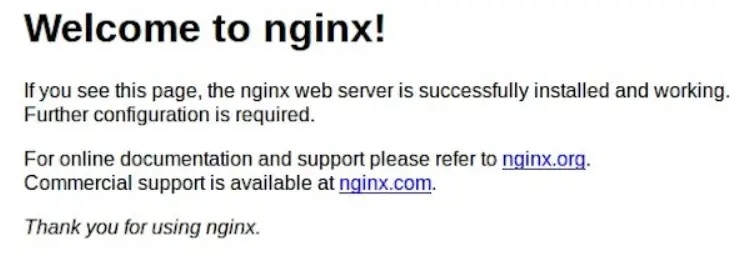
最后我们就可以通过http://localhost访问nginx,当看到这个页面,就说明成功了
创建SystemCtl服务
每次启动停止都得输入sudo /usr/local/nginx/sbin/nginx很不方便,我们可以通systemctl控制,使用systemctl start/stop/reload nginx就可以启动、关闭、重启nginx
- 安装systemctl
sudo apt update
sudo apt install systemctl
- 创建 nginx.service 文件
sudo vim /etc/systemd/system/nginx.service
- 写入以下内容(根据你的安装路径调整)
[Unit]
Description=The Nginx HTTP and reverse proxy server
After=network.target

[Service]
Type=forking
PIDFile=/usr/local/nginx/logs/nginx.pid
ExecStart=/usr/local/nginx/sbin/nginx
ExecReload=/usr/local/nginx/sbin/nginx -s reload
ExecStop=/usr/local/nginx/sbin/nginx -s quit
PrivateTmp=true
User=www-data
Group=www-data

[Install]
WantedBy=multi-user.target
- PIDFile:Nginx 的 PID 文件路径(如果 nginx.conf 里没指定,默认在 logs/nginx.pid)。
- User/Group:运行 Nginx 的用户(编译时指定的 –user=www-data –group=www-data)。
- ExecStart/ExecStop:启动和停止命令。
- 重新加载 Systemd 并启动 Nginx
sudo systemctl daemon-reload       # 重新加载服务配置
sudo systemctl start nginx         # 启动 Nginx
sudo systemctl enable nginx       # 设置开机自启
- 检查状态
sudo systemctl status nginx
Nginx模块介绍
前面在编译设置命令./configure --prefix=/usr/local/nginx/ --user=www-data --group=www-data --with-http-stub-module,有个-with-http-stub-module,这是Nginx的模块,这也是我们为什么选择编译安装的原因,可以编译我们想要的官方模块和第三方模块。
下面我会介绍官方和第三方每个模块的作用
官方核心模块(默认启用,无需额外配置)
| 模块名 | 作用 |
|---|---|
| http_core_module | 提供 HTTP 服务核心功能(必选) |
| http_access_module | 基于 IP 的访问控制(allow/deny) |
| http_auth_basic_module | 基础认证(用户名/密码保护) |
| http_gzip_module | Gzip 压缩响应 |
| http_proxy_module | 反向代理支持 |
| http_rewrite_module | URL 重写(rewrite 指令) |
| http_ssl_module | HTTPS/SSL 加密支持 |
| http_log_module | 访问日志功能 |
官方可选模块(需手动启用,使用--with...添加)
| 模块名 | 作用 | 启用参数 |
|---|---|---|
| http_stub_status_module | Nginx 状态监控页面 | –with-http_stub_status_module |
| http_realip_module | 获取客户端真实 IP(用于反向代理) | –with-http_realip_module |
| http_addition_module | 在响应前后添加内容 | –with-http_addition_module |
| http_sub_module | 替换响应内容 | –with-http_sub_module |
| http_dav_module | WebDAV 支持(文件管理) | –with-http_dav_module |
| http_flv_module | FLV 视频流支持 | –with-http_flv_module |
| http_mp4_module | MP4 视频流支持 | –with-http_mp4_module |
| http_geoip_module | 根据 IP 地理信息过滤 | –with-http_geoip_module(需安装 libgeoip-dev) |
| http_perl_module | 嵌入 Perl 脚本 | –with-http_perl_module |
- 示例
./configure \
    --with-http_stub_status_module \
    --with-http_ssl_module \
    --with-http_realip_module
第三方模块(需要编译安装Nginx)
| 模块名 | 作用 | 集成方式 |
|---|---|---|
| ngx_http_headers_more | 更灵活的 HTTP 头控制 | –add-module=/path/to/headers-more-nginx-module |
| ngx_brotli | Brotli 压缩(比 Gzip 更高效) | –add-module=/path/to/ngx_brotli |
| ngx_cache_purge | 缓存清理(用于 FastCGI/Proxy) | –add-module=/path/to/ngx_cache_purge |
| ngx_lua | Lua 脚本支持(OpenResty 基础) | –add-module=/path/to/lua-nginx-module |
| ngx_http_echo | 调试和动态响应生成 | –add-module=/path/to/echo-nginx-module |
| ngx_http_auth_pam | PAM 认证支持 | –add-module=/path/to/nginx-auth-pam |
- 安装示例
git clone https://github.com/openresty/headers-more-nginx-module.git
- 编译时通过 –add-module 指定路径
./configure \
    --add-module=/path/to/headers-more-nginx-module \
    --with-http_ssl_module
- 编译并安装
make && sudo make install
动态模块(Nginx 1.9.11+ 支持)
Nginx 1.9.11 后支持动态加载模块(无需重新编译)
./configure --modules-path=/usr/lib/nginx/modules --with-compat
动态模块文件为 .so 格式,可通过 load_module 指令在nginx.conf配置文件中加载
load_module modules/ngx_http_geoip_module.so;
(1) Nginx 官方提供了一些内置的动态模块,可以在编译时启用
./configure --with-http_geoip_module=dynamic \
           --with-http_image_filter_module=dynamic \
           --with-mail=dynamic \
           --with-stream=dynamic
(2) 第三方动态模块
- 下载源码
ngx_http_geoip2_module(IP 地理位置)
git clone https://github.com/leev/ngx_http_geoip2_module.git
nginx-rtmp-module(流媒体支持)
git clone https://github.com/arut/nginx-rtmp-module.git
lua-nginx-module(Lua 脚本支持)
git clone https://github.com/openresty/lua-nginx-module.git
- 编译动态模块(使用 –add-dynamic-module),
注意:是进入nginx的源码编译,--add-dynamic-module=指的位置是动态模块源码的位置
tar -xzf lua-nginx-module.tar.gz # 解压动态模块源码

./configure --with-compat --add-dynamic-module/path/to/module

make modules # 编译
- 复制
.so文件
cp objs/*.so /usr/local/nginx/modules/
- 加载模块,在
nginx.conf中添加:
load_module modules/ngx_http_geoip2_module.so;
如何查看已安装的模块?
nginx -V # 查看编译参数和已启用的模块
- 输出示例:
configure arguments: --with-http_ssl_module --with-http_stub_status_module